Thursday, January 30, 2025

Simple Method To Freeze Raw Mushrooms

Eight ounces of white button
mushrooms prepared to freeze.

Ingredients/Supplies:

fresh mushrooms

vegetable cleaning brush or paper towel

waxed paper or parchment lined baking sheet or dish

freezer bag

airtight storage container

Method:

Use a brush or paper towel to any dirt from the mushrooms. If necessary, the paper towel may be slightly damp, but do not soak or wash the mushrooms because that will make them soggy.

Trim any dry or "woody" parts off of the stems. Slice and lay in a single layer on the prepared pan. (Smaller mushrooms, like beech mushrooms, may be frozen whole.)

Place in freezer for one hour until solid and then transfer to a freezer bag. Remove as much air as possible to help prevent freezer burn. For extra protection, place the bag of mushrooms in an airtight container.

May be stored in the freezer up to 6 months, but for the best quality use with 2 months.

Notes:

Frozen mushrooms are great to use in soups and stews. Fresh mushrooms are best in salads, stir fried dishes and on pizza.

My local grocery store had fresh mushrooms (not ready to expire) on sale for half of the regular price. I purchased a couple of  packages to freeze for future recipes.


Fresh Spinach & Winter Fruits Salad

One serving of salad ~ Delicious & Refreshing!

Dressing Ingredients:

4 tablespoons olive or avocado oil

2 tablespoons apple cider vinegar

2 tablespoons white wine vinegar

2 teaspoons sugar or honey

1/8 smoked paprika

1/8 teaspoon onion powder

1/8 teaspoon black pepper

1 tablespoon poppyseeds

Salad Ingredients:

1 large honeycrisp or fuji apple

1 teaspoon lemon juice

5 cups (5 ounces) baby spinach

3/4 cup (about 2 medium stalks) celery chopped

3/4 cup dried cranberries

1 (15 ounce) can mandarin oranges, drained or 3 - 4 fresh mandarin oranges separated into segments

1/2 cup pomegranate seeds (optional)

1 cup toasted or candied pecans**

Optional Garnish:

1/2 - 3/4 cup crumbled feta or blue cheese

Method:

Add all of the dressing ingredients to a jar or cruet with a lid. Attach the lid and shake to mix. Set aside. Or, place in the refrigerator for 20 minutes or longer.

Chop the apple and toss with the lemon juice.

Toss the remaining salad ingredients and the apples together. Toss with the dressing or serve with the dressing on the side. Garnish with the cheese or serve on the side. Makes 6 two cup servings or 12 one cup servings.

**Raw pecans may be used, but I prefer them to be toasted or candied. Here are links for quick and simple recipes for toasted and candied pecans:

https://carriekitchencreations.blogspot.com/2016/06/toasted-pecans.html

https://carriekitchencreations.blogspot.com/2018/02/favorite-cinnamon-candied-pecans-or.html

Note: This delicious salad is very refreshing. The ingredients also provide a healthy boost to the thyroid glands.

Wednesday, January 29, 2025

Easy Lemon No Bake Cookies 🍋

These tasty & healthy lemon & oat
cookies are so simple to make! 
🍋

Ingredients:

1 1/2 cups sugar

3/4 cups ( 1 1/2 sticks) butter

2/3 cup milk

1 small box instant lemon pudding

3 1/2 cups quick oats

1 teaspoon pure vanilla extract

Method:

Line two baking sheets with waxed paper and set aside.

Stir together the sugar, butter and milk over medium heat in a large suacepan. Stir occasionally while the butter melts and then bring to a boil. Allow to boil for 5 minutes and then remove the pan from the heat.

Add the vanilla and pudding mix. Whisk until blended and smooth. Stir in the oats. Drop by tablespoonfuls onto the prepared baking sheets. (I used a rounded 1 tablespoon scoop.)

Refrigerate to cool and set. May be stored in an airtight container at room temperature or in the refrigerator. (I prefer the refrigerator.) Makes 4 dozen cookies.

Notes:

These cookies would be easy and fun for kids to make.

I made these for my husband because he loves anything lemon and I like the added nutrition of the oats. (He prefers them stored in the freezer.)

Tuesday, January 28, 2025

Quick & Tasty Pita Flatbread Pizzas ~ Easy & Fun For Adults & Kids

These mini pizzas are simple and delicious!


Ingredients: 

2 large (8 inch) pita breads (white or whole wheat)

2 teaspoons olive oil

1/2 cup of your favorite pasta sauce (I used a traditional no sugar marinara.)

4 ounces (1 cup) shredded mozzarella cheese

1 ounce (1/4 cup) grated parmesan, asiago or romano cheese

1/2 cup meat: pepperoni, cooked sausage, cooked chicken, etc.

1/2 cup vegetables: mushrooms, olives, bell pepper, onions

1/2 teaspoon Italian seasoning 

Method:

Preheat oven to 400*. Line a baking sheet with parchment or foil.

Place the pita breads on the prepared baking sheet. Add one teaspoon of olive oil to the center of each bread. Brush the oil from the center out to the edges to completely cover the entire breab.

Add 1/4 cup of sauce to the center of the bread. Use a spatula to spread the sauce evenly over the pita, being careful to leave a small boarder around the the outer edge.


Top the sauce, on each pita, with 1/2 cup of mozzarella cheese and 2 tablespoons of the parmesan cheese. 

Cut pepperonis in half, chop or slice chicken or crumble sausage evenly between the two pitas. Chop or slice the vegetables and sprinkle over the pitas. Sprinkle 1/4 teaspoon of Italian seasoning over each pizza.

Bake for 10 to 12 minutes or until the cheese is melted and the edges are golden. (Cooking for 12 minutes will result in a crispier crust.)

Cool for a couple of minutes. Cut into quarters with a pizza cutter or sharp knife.

Serves 2  to 4 (with or without a side salad). Recipe may be doubled or trippled. 😀

Notes: 

The idea for these pizzas came from my husband. We both were plesed with the flavors and texture. He said, "Better than Dijourno". 😀

You can customize your pizzas by choosing the sauce, meats and vegetables that you like.

Prep the pita breads with the oil and sauce and let the kids choose their own toppings. 😀

Sunday, January 19, 2025

Keto Low Carb Slow Cooker Creamy Beef Taco Soup


This delicious soup is so simple to make~
it smells and tastes like beef tacos!  
🌮

Ingredients:

2 pounds 93% lean ground beef

4 ounces reduced fat cream cheese

2 (10 ounce) cans Rotel*

1 tablespoon homemade taco seasoning**

4 cups low sodium chicken broth

1 cup lowfat Greek yogurt

1/2 cup cilantro leaves

Garnishes:

1 cup chopped butterleaf or romaine lettuce

1/2 cup reduced fat cheddar or mozzarella cheese

1/4 cup chopped cilantro leaves

Method:

Brown the ground beef in a large skillet over medium heat.

While the meat is browning, add the cream cheese, Rotel and seasoning to the slow cooker pot.

Transfer the cooked meat to a collander of seive to drain away the grease. Add to the pot. Stir to mix. Pour in the broth and stir. Cover and cook on low for 4 hours or 2 hours on high. 

Thirty minutes before the soup finishes cooking, stir in the yogurt and 1/2 cup of cilantro. Cover and continue cooking. Makes 10 cups. Six (1 2/3 cup) servings. Garnish each serving with 2 tablespoons + 2 teaspoons chopped lettuce, 1 tablespoon + 1 teaspoon shredded cheese and 2 teaspoons chopped cilantro.

*I used the fire roasted Rotel.

**Homemade Taco Seasoning is very simple to make and doesn't contain the chemical ingredients and cornstarch that storebought seasoning contains.

Homemade Low Carb Taco Seasoning:

2 teaspoons instant minced onion            1/4 teaspoon garlic powder

1 teaspoon salt                                                1/4 teaspoon dried oregano 

1 teaspoon chili powder                                 1/2 teaspoon cumin

1/4 to 1/2 teaspoon crushed dried red pepper (optional ~ if you don't like extra spice or heat, you can omit this ingredient)

Combine in a small bowl. Save unused seasoning in an airtight container. (The recipe may be doubled, tripled, etc.

Nutritional info per 1 2/3 cup serving, approximately: 361 calories ~ 21.6 grams fat ~ 14 grams carbs ~ 9 grams fiber ~ 5 grams net carbs ~ 56.25 grams protein

Note: My husband and I both loved this soup ~ so simple, flavorful & delicious!

Saturday, January 18, 2025

Optavia Low Carb Slow Cooker Creamy Beef Taco Soup ~ Lean & Green

This delicious soup is so simple to make~
it smells and tastes like beef tacos!  
🌮

Ingredients:

2 pounds 93% lean ground beef

4 ounces reduced fat cream cheese

2 (10 ounce) cans Rotel*

1 tablespoon homemade taco seasoning**

4 cups low sodium chicken broth

1 cup lowfat Greek yogurt

1/2 cup cilantro leaves

Garnishes:

1 cup chopped butterleaf or romaine lettuce

1/2 cup reduced fat cheddar or mozzarella cheese

1/4 cup chopped cilantro leaves

Method:

Brown the ground beef in a large skillet over medium heat.

While the meat is browning, add the cream cheese, Rotel and seasoning to the slow cooker pot.

Transfer the cooked meat to a collander of seive to drain away the grease. Add to the pot. Stir to mix. Pour in the broth and stir. Cover and cook on low for 4 hours or 2 hours on high. 

Thirty minutes before the soup finishes cooking, stir in the yogurt and 1/2 cup of cilantro. Cover and continue cooking. Makes 10 cups. Six (1 2/3 cup) servings. Garnish each serving with 2 tablespoons + 2 teaspoons chopped lettuce, 1 tablespoon + 1 teaspoon shredded cheese and 2 teaspoons chopped cilantro.

*I used the fire roasted Rotel.

**Homemade Taco Seasoning is very simple to make and doesn't contain the chemical ingredients and cornstarch that storebought seasoning contains.

Homemade Low Carb Taco Seasoning:

2 teaspoons instant minced onion            1/4 teaspoon garlic powder

1 teaspoon salt                                                1/4 teaspoon dried oregano leaves

1 teaspoon chili powder                                 1/2 teaspoon cumin

1/4 to 1/2 teaspoon crushed dried red pepper (optional ~ if you don't like extra spice or heat, you can omit this ingredient)

Combine in a small bowl. Save unused seasoning in an airtight container. (The recipe may be doubled, tripled, etc.

Each 1 2/3 cup serving with garnish equals: 1 lean, 1 green & 3 condiments

Nutritional info per serving, approximately: 313.4 calories ~ 15.8 grams fat ~ 13.4 grams carbs ~ 8.4 grams fiber ~ 5 grams net carbs ~ 57.7 grams protein

Note: My husband and I both loved this soup! (The original recipe was from Optavia. This is my version with a few small changes.)

Friday, January 17, 2025

Lindsay's Slow Cooker Tom Kha (Thai Coconut Soup) ~ Family 🥥

Tom Kha is a delicious, comforting
and aromatic Thai spicy and sour 
soup made with coconut milk. 
🥣 

Ingredients: 

2 pounds boneless, skinless chicken breasts

1 (13.5 ounce) can coconut milk

4 cups chicken broth

2 inches (2 tablespoons) fresh ginger root, thinly sliced or minced

4 to 6 cloves garlic, minced

1 onion (1 cup chopped)

2 carrots, sliced

2 stalks celery, diced

1 stalk (2 tablespoons) lemongrass*

1 red, orange or yellow bell pepper (1 cup chopped)

1 to 2 cups sliced cremini or shitake mushrooms

1 to 3 tablespoons red miso paste (adjust to suit your taste)

1 to 2 tablespoons rice wine vinegar (to taste)

1/2 teaspoon cumin

1 tablespoon turmeric

salt & pepper to taste

1/2 teaspoon red pepper flakes

2 tablespoons fish sauce**

Optional Garnishes:

2 to 3 green onions, chopped

fresh cilantro, chopped

Method:

Season the chicken with salt and pepper.  Place in the bottom of the slow cooker.

Warm 1/2 cup of the broth or coconut milk. Put the red miso paste into a small bowl. Add the warm liquid and mix until the paste is dissolved. Set aside.

Layer the onion, carrots, celery, lemongrass, bell pepper and mushrooms on top of the chicken. Sprinkle the garlic and ginger over the vegetables. Pour the coconut milk and broth over all. Stir in the dissolved miso, cumin, turmeric and fish sauce.

Cook on low for 6 to 8 hours or on high for 3 to 4 hours, just until the chicken is tender. 30 minutes before the soup has finished cooking, use two forks to shred the chicken and stir to mix. Stir in the vinegar and red pepper flakes. Add additional salt and pepper to taste.

Ladel into serving bowls and if desired garnish with chopped green onions and cilantro. Serves 6 to 8.

*Cilantro stems may be sustituted for the lemongrass

**Soy sauce may be substituted for the fish sauce

Notes:

Daughter-in-law Lindsay uses AI to help her create menus and meals. (She named her AI aide "Fred". She told Fred that she wanted to make a soup with chicken, coconut milk and Thai spices because she wanted soup and her husband, Sean likes Thai flavors. This is the beautiful recipe that Linsay & Fred came up with. She says that she always double checks Fred's recipes because sometimes he goes "wonky". 😁

Tom Kha is a very delicious & healthy soup that is perfect to serve during the cold and flu season ~ The ginger, garlic, mushrooms and lemongrass all help to boost and support the immune system. 🥣

Daughter-in-law Lindsay
with the grandkiddos
in 2012 


Low Carb Perfect Air Fryer Roasted Garlic 🧄

Roasted garlic is a wonderful appetizer
or addition to salads, pastas or vegetables! 

Ingredients:

1 or more heads of garlic

1/2 tablespoon (1 1/2 teaspoons) olive oil per head of garlic

aluminum foil

Method:

Peel off the outside, loose papery layers from the bulb of garlic. Slice the top 1/4 inch off of the top of the cloves. Place each head of garlic on a piece of aluminum foil. Drizzle olive oil over the top of the cut ends of the garlic. Fold closed the top and sides of the foil to make a pouch around the garlic bulb.

Preheat the airfyer to 390*. Place the pouches in the air fyer. Cook 20 minutes for roasted solid cloves of garlic. Cook for 30 minutes for spreadable roasted garlic.

Use tongs to remove the pouches from the air fryer. Allow the roasted garlic to rest inside of the pouches for 5 minutes. Unwrap the pouches. For whole cloves, squeeze to remove the cloves from the husk. (A butter knife or small spoon can also be used to remove the cloves.) 

For spreadable gloves, serve with keto chips or toast triangles slices and a butter knife or mini spreading knife.

May be stored in an airtight container in the refrigerator for up to 5 days. To store in the freezer, line a small pan or cutting board with waxed paper and place individual cloves on the waxed paper. 

After the cloves are frozen, package in an airtight container or freezer bag and store in the freezer for up to 6 months. 

Nutritional info per clove: 10 calories ~ 1 gram fat ~  .8 grams carbs ~ .1 gram protein

Note: Roasted garlic  can be used in any recipe that calls for fresh garlic. It also works very well and enhances the flavor of dips, sauces, vegetables, soups, salads and main dishes.

Thursday, January 16, 2025

Perfect Air Fryer Roasted Garlic 🧄

One of my favorite things ~ Roasted Garlic
spread on pita chips or toasted baguette slices!

🧄 Roasted garlic is a wonderful appetizer or addition to salads, pastas or vegetables! 🧄

Ingredients:

1 or more heads of garlic

1/2 tablespoon (1 1/2 teaspoons) olive oil per head of garlic

aluminum foil

Method:

Peel off the outside, loose papery layers from the bulb of garlic. Slice the top 1/4 inch off of the top of the cloves. Place each head of garlic on a piece of aluminum foil. Drizzle olive oil over the top of the cut ends of the garlic.


Fold closed the top and sides of the foil to make a pouch around the garlic bulb.

Preheat the airfyer to 390*. Place the pouches in the air fyer. Cook 20 minutes for roasted solid cloves of garlic. Cook for 30 minutes for spreadable roasted garlic.

Use tongs to remove the pouches from the air fryer. Allow the roasted garlic to rest inside of the pouches for 5 minutes. Unwrap the pouches. For whole cloves, squeeze to remove the cloves from the husk. (A butter knife or small spoon can also be used to remove the cloves.) 

For spreadable gloves, serve with pita chips or toasted baguette slices and a butter knife or mini spreading knife.

May be stored in an airtight container in the refrigerator for up to 5 days. To store in the freezer, line a small pan or cutting board with waxed paper and place individual cloves on the waxed paper. 

After the cloves are frozen, package in an airtight container or freezer bag and store in the freezer for up to 6 months. 

Note: Roasted garlic can be used in any recipe that calls for fresh garlic. It also works very well in dips, sauces, vegetables, salads, mashed potatoes and pasta dishes.


Wednesday, January 15, 2025

Low Carb Bourbon Glaze For Poultry & Pork


This simple glaze is a mild & flavorful addition
to dress up poultry and pork ~ elevating your meal.

Ingredients: 

1/2 cup Brown Monkfruit Sweetener

1/2 cup bourbon

2 tablespoons liquid aminos

2 tablespoons unsalted butter

1 teaspoon smoked paprika

Method:

Add all of the ingredients to a saucepan. Heat over medium-high heat, stirring, until the mixture reaches a boil. Reduce the heat to medium and simmer for 8 to 10 minnutes, stirring occasionally  until the liquid is reduced by half. (A spoon dipped into the glaze should be coated when lifted from the pot.) 

Reduce the heat to low until ready to pour over cooking meat or serving. Makes about 3/4 cup of glaze.

Notes:

Use this glaze to pour over roast turkey breast, whole chicken, ham, pork roast or pork chops during the last 30 minutes of cooking. Or, drizzle over cooked meats before serving.

Nutritional info for 3/4 cup of glaze: 766.4 calories ~ 24.3 grams fat ~ 1.2 grams carbs ~ .8 grams fiber ~ .4 grams net carbs ~ 6.5 grams protein

Nutritional info for 2 tablespoons of glaze: 127.7 calories ~ 4 grams fat ~ .2 grams carbs ~ .13 grams fiber ~ .06 net carbs ~ 1 gram protein

Simple Bourbon Brown Sugar Glaze For Poultry, Pork & Vegetables

This simple glaze is a mild & flavorful addition
to dress up poultry, pork and vegetables!

Ingredients: 

1/2 cup packed brown sugar

1/2 cup bourbon

2 tablespoons soy sauce (I use low sodium)

2 tablespoons unsalted butter

1 teaspoon smoked paprika

Method:

Add all of the ingredients to a saucepan. Heat over medium-high heat, stirring, until the mixture reaches a boil. Reduce the heat to medium and simmer for 8 to 10 minnutes, stirring occasionally  until the liquid is reduced by half. (A spoon dipped into the glaze should be coated when lifted from the pot.) 

Reduce the heat to low until ready to pour over cooking meat or serving. Makes about 3/4 cup of glaze.

Notes:

Use this glaze to pour over roast turkey breast, whole chicken, ham, pork roast or pork chops during the last 30 minutes of cooking.

It also is nice to add to carrots, beets, sweet potatoes, acorn and butternut squashes.

My husband doesn't like gravy or most sauces, so I made this for him to drizzle over his cooked turkey breast and beets ~ he liked it! 


Citrus & Sour Cream Pound Cake 🍋🍊🍈

This delicious cake is fragrant, light & moist!

Cake Ingredients:

1 tablespoon shortening (I use butter flavored)

3 tablespoons flour for dusting

2 1/2 cups all purpose flour

1/2 teaspoon pink Himalayan or sea salt

1/2 teaspoon baking powder

1/2 teaspoon baking soda

1 cup sour cream or plain Greek yogurt, at room temperature

1 teaspoon pure vanilla extract

1 tablespoon finely grated lime zest**

1 tablespoon finely grated lemon zest**

2 tablespoons finely grated orange zest**

1 cup (2 sticks) unsalted butter, at room temperature

2 1/4 cups sugar

4 eggs, at room temerature

Glaze Ingredients:

1 1/4 cups powdered sugar

1/4 cup fresh lemon juice

1/2 teaspoon pure vanilla extract

1 teaspoon finely grated lemon zest

Method:

Preheat oven to 350*. Thoroughly grease the inside of a bundt cake pan. Dust with flour and tap out the extra. Set aside.

In a medium bowl, sift together the flour, salt, baking powder and baking soda. Set aside.

In a smaller bowl, stir together the sour cream, vanilla and lime, lemon and orange zests. Set aside.

In a large mixing bowl, cream together the butter and sugar with an electric mixer, on medium-high speed, for 3 minutes. (The mixture will be light and fluffy.) Scrape down the sides of the bowl.

Add the eggs one at a time, mix well on low speed. Scrape down the sides of the bowl before adding each egg.

Add the flour mixture and the sour cream mixture alternately into the butter mixture, beginning and ending with the flour mixture. Mix on low after each addition, being careful not to overmix. 

Spoon the batter evenly into the prepared cake pan. Place the pan on a baking sheet with sides. Bake for 50 to 60 minutes. Insert a pick into the middle of the cake after 50 minutes. If it comes out clean, the cake is done. If it comes out wet, return the cake to the oven and cook for another 5 to 10 minutes.

PLace a cooling rack in or on top of a baking sheet with sides. When the cake has finished baking, transfer to a cooling rack. Cool in the pan for 10 to 15 minutes. 

Use a butter knife to carefully loosen the sides of the cake from the pan. Invert onto the cooling rack. Allow to cool completely before topping with the glaze.

Whisk together the powdered sugar, juice, vanilla and zest until the mixture is smooth. Spoon or pour over the top of the cake and serve. (For a thicker glaze, use a little less lemon juice.) Serves 12

The baking sheet under the rack catches
any glaze that runs off of the cake. I used
a spatula to gather the runoff and
redrizzled it over the top of the cake.

**When I purchase bags of lemons, limes and oranges, I zest and then juice the fruits. I freeze 1 teaspoon and 1 tablespoon portions of the zest in little plastic condiment to go containers with lids. I freeze the juice in ice cube trays and then transfer to a freezer storage bag or container. Then, I always have zest and juice on hand when I need it. 😀

Notes: 

My husband's favorite cakes are lemony ones and I had 1 cup of sour cream that I needed to use, so I baked this simple cake. It didn't disappoint and he was very pleased with the flavor, texture and how moist it was!

This cake is wonderful on its own, but would also pair nicely with fresh berries and whipped cream.


Tuesday, January 14, 2025

Irish Style Soup/Stew

This soup/stew contains tender chunks of
meat and vegetables in a flavorful broth.

Ingredients:

1 1/2 pounds baby yellow potatoes

3 pounds lamb or beef cut into bite sized chunks

salt and pepper 

2 tablespoons avocado oil, divided

1 yellow onion, chopped

4 1/2 cups chicken or vegetable broth

1 1/2 teaspoon dried rosemary leaves*

2 carrots, chopped

2 stalks celery, chopped

water, as needed

1/4 cup flour**

1/4 cup chopped green onions or 2 teaspoons dried chives

Method:

Wash the potatoes and set aside.

Season the meat with salt and pepper. Heat the oil in a large heavy skillet over high heat. Brown the meat on all sides and then transfer to a large pot or Dutch oven.

Add the remaining oil and the onion to the same skillet. Cook and stir over medium high heat for 5 minutes or until the onions are softened and the edges are browning. 

Stir the 4 cups of broth into the onions and bring to a boil. Add the rosemary. Stir for 2 minutes.

Add the carrots and celery to the pot with the meat. Carefully pour the contents of the skillet over the top of  the meat and vegetables in the pot. Add water as needed to completely cover the contents of the pot. Stir to mix. Mix the flour with the remaining broth until well blended.**

Heat over medium high heat just until the edges start to bubble. Reduce the heat to low, cover with a lid and cook for 1 hour.

Cut the potatoes in half and add to the stew pot. Stir and cover and continue to cook for another 30 minutes or until the potatoes are tender. Return to a boil for 12 minutes or until the stew is thickened.

Stir in the green onions. Taste the stew and and season with additional salt and pepper as desired. Makes 6 to 10 servings.

*If you don't like rosemary, you can use basil or tarragon instead.

**If you prefer a thinner broth or soup consistency, use 1/4 flour. If you prefer a thicker consistency, increase the flour to 1/2 cup and add 1/4 cup water to the 1/2 cup of broth.

Note: This soup/stew is a delicious and fragrant comfort food ~ A Perfect cold weather meal!  ❤️

Monday, January 13, 2025

Honeycrisp Apple Salad With Honey Dijon Vinaigrette

This pretty salad is fresh & flavorful!

Dressing Ingredients:

2 tablespoons honey

1/4 cup apple cider vinegar

2 tablespoons Dijon mustard

1/3 cup extra virgin olive oil

1 pinch kosher salt (or sea salt) about 1/8 teaspoon

1/2 teaspoon black pepper

Salad Ingredients:

8 cups butterleaf lettuce*

1 large Honeycrisp apple, cored and chopped

4 slices of crisp bacon, chopped or crumbled

1/2 cup thinly sliced celery (about 2 stalks)

1/2 cup dried cranberries

1/2 of a medium red onion, thin sliced

2/3 cup honey roasted mixed nuts or peanuts

1/2 cup feta, blue or gorgonzola cheese, crumbled

Method:

Prepare the dressing at least 30 minutes, or the day before preparing the salad. 

Add the honey to a glass measuring cup or microwave safe bowl. Heat for 20 seconds in a microwave oven.**

Whisk the remaining dressing ingredients into the honey. Place in a cruet or jar with a lid and refrigerate. Makes 3/4 cup dressing.

Add the lettuce to a large serving bowl. Top with all of the remaining salad ingredients except for the cheese. Drizzle the dressing over the top of the salad. Gently toss and sprinkle the cheese over the top. Makes 4 to 6 servings. 

Alternate Method:

Instead of one large bowl, divide the lettuce between 4 to 6 serving plates or bowls. Evenly top the individual portions of lettuce with the remaining salad ingredients and drizzle the dressing over the top. Makes 4 to 6 servings.

*I prefer butterleaf lettuce, but romaine or red leaf would also work well. 

**The honey can also be heated in a small saucepan and the dressing ingredients whisked in.

Notes: This delicious salad can be served as a main dish or side dish. For a heartier main dish and for extra protein, I add chopped cooked turkey or chicken breast to the salad. 

Sunday, January 12, 2025

Crispy Air Fried Bacon (NO Mess, Perfect & Non-Greasy!)

Perfect, crisp, non greasy bacon!

Ingredients:

one package regular or thick cut bacon

Method 1:

If you have a tray fryer/oven, line the bottom pan, with sides, with aluminum foil.

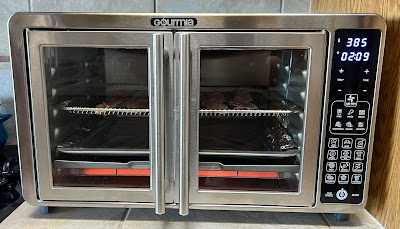
Arrange 5 or 6 slices of bacon on the mesh tray. If your fryer as a "bacon" setting use that. If not, air fry at 400* for 10 to 13 minutes.** Use tongs to turn the bacon half way through cooking. 

Air Fryer preheating

Remove from the fryer and use tongs to transfer cooked slices to a cutting board or plate that has a double layer of paper towels. Repeat the process with the remaining bacon.

Very carefully remove the foil lined pan & discard the foil and grease.

Method 2:

Basket style air fryer

If you are using a basket fryer, place 4 o5 slices of bacon flat in the bottom of the basket. Cook at 400* for 10 t0 13 minutes.** Turn over halfway through cooking. 

Use tongs to transfer cooked slices to a cutting board or plate that has a double layer of paper towels. Carefully drain and discard the grease from the basket.

Repeat the process with the remaing bacon. Eat right away or store in the refrigerator for 4 days or in the freezer for a few months.

**How long you cook your bacon is determined by how crisp you want it to be.

Notes:

This method is so easy and there is no grease splatter! After cooking two trays of bacon, there was less than 3 tablespoons of grease in the foil lined pan below.

I always cook the entire package of bacon. I chop it and keep it in an airtight container in the freezer. Then I have bacon on hand to add to salads, eggs, soups, stews and other dishes.

My husband likes bacon, but in the past, he has rarely eaten it because he prefers his bacon very cripy and thinks most bacon is too greasy. He was very impressed with this cooking method and said it was the best bacon he has ever had!


Friday, January 10, 2025

Lean & Green Asian Style Vegetable Beef Soup

A tasty soup that is simple to make!

Ingredients:

14 ounces can Palmini noodles**
almond milk
1 pound lean beef stew meat
1/2 teaspoon black pepper
1/2 teaspoon pink Himalayan or sea salt
1/2 teaspoon ground coriander
1 tablespoon avocado or coconut oil
1/2 cup yellow onion
2 large cloves of garlic, chopped
1 two inch piece of ginger root
5 cups beef broth
8 ounce can sliced bamboo shoots
1 small (or 1/2 large) cinnamon stick
1 star anise
1 teaspoon Worcestershire sauce
4 green onions, chopped
1 tablespoon dried cilantro
1/8 teaspoon dried red pepper flakes
8 ounces sliced mushrooms

Method:
Drain the Palmini noodles and rinse with water. Place in a container and cover with almond milk. Soak for 30 minutes.
Cut the beef into bite sized pieces. Place in a bowl and sprinkle the pepper, salt and coriander over the meat and stir to coat. Set aside. Add the oil to a Dutch oven, or soup pot. Over medium-high heat, brown the beef on all sides. Remove the browned beef and set aside. Add the onion, garlic and ginger to the pan and sauté, over a medium heat for 2 to 3 minutes, being careful not to burn.
Return the beef to the pot and add the broth.  
Drain the liquid from the bamboo shoots and Palmini noodles. Set aside.
Add the cinnamon, anise, Worcestershire, chives and cilantro to the soup pot.
Chop the bamboo shoots and Palmini to desired size. Add with the mushrooms to the soup.
Continue to simmer for 30 minutes or longer. (Lower the heat to prevent bubbling over.) 
Remove and discard the cinnamon stick, star anise and ginger root. Makes 10 cups. (Ten 1 cup servings.)

**Hearts of Palm "noodles" 
(I found these at a Walmart Neighborhood Market.)**


1 cup of soup equals: 1/4 lean, 1 1/10 greens, 1/3 of a fats & 2.8 condiments

Nutritional info per 1 cup serving, approximately:

130 calories ~ 5 grams fat ~ 2.9 grams net carbs ~ 17.75 grams protein

Note: This delicious soup is healthy and flavorful! Because it only equals 1/4 a lean and 1 1/10 green, add 1/2 of a lean serving from one of the lean categories and 2 additional green servings.