Friday, April 29, 2022

Low Carb Taco Dip ~ Lean & Green


This is a meal sized portion
of a creamy & delicious taco dip
with vegetables. 
🥑🍅🧅 

Ingredients: 

avocado cooking oil spray

8 ounces light cream cheese, at room temperature*

1 cup fat free Greek yogurt*

1/2 cup salsa**(see recipe link below)

1/4 teaspoon pink Himalayan or sea salt

1/2 teaspoon chili powder

1/4 teaspoon onion powder

1/4 teaspoon dried oregano

1/4 teaspoon garlic powder

1/4 teaspoon cumin

7.5 ounces (96% lean) cooked ground beef or turkey

1 cup (4 ounces) reduced fat pepper jack or cheddar cheese, finely grated

1 cup diced grape or cherry tomatoes

1 small avocado, diced

1/4 cup diced onion

4 cups (about 20) mini bell peppers

Dinner Method:

Preheat oven to 325*. Very lightly grease an 8 inch square baking dish with the avocado oil and set aside.

Add the cream cheese, yogurt, salsa and the spices to a large bowl. Use an electric mixer to combine the ingredients until they are blended and smooth. Stir in the cooked meat. Transfer the mixture to the prepared pan and use a bowl scraper to smooth evenly in the pan. Place in the oven. Bake for 15 to 20 minutes.

While the dip is heating, cut the stems and tips off of the mini peppers. Cut the peppers in half and remove the seeds. Rinse and drain the pepper halves on paper or cloth towels. 

Remove the dip from the oven and. Cut into 4 equal portions. Place each portion on a serving plate. Sprinkle 1/4 cup of the cheese, 1/4 cup of the tomatoes, 1/4 of the avocado and 1 tablespoon of the onions over the top of each individual dip portion. Add 10 pepper halves to each serving plate and serve. Makes 4 meal servings.

Appetizer Method:

Prepare same as above. After the dish is removed from the oven, do not divide into portions. Instead, Sprinkle all of the cheese over the top of the dip, followed by the tomatoes, avocado and onions. Serve warm or chilled with the pepper halves for dipping. Makes 12 appetizer servings.

*If you are not following a reduced fat meal plan, regular cheese and yogurt may be used.

**Here is a link to a super simple homemade picante sauce recipe: https://carriekitchencreations.blogspot.com/2022/01/super-simple-low-carb-picante-sauce.html

Super Simple Low carb
Picante Sauce

Nutritional information for 1 dinner portion, approximately: 470.6 calories ~ 25.55 grams fat ~ 27.48 grams carbs ~ 19.8 grams net carbs  ~ 33.85 grams protein

One dinner portion equals: 1 lean, 3 green, 3 condiments & 1 healthy fat

Nutritional information for 1 appetizer portion, approximately: 156.8 calories ~ 8.5 grams fat ~ 9 grams carbs ~ 6.6 grams net carbs ~ 11.28 grams protein
One appetizer portion equals: 1/4 lean, 3/4 green, 3/4 condiments &  1/4 healthy fat

Notes: My husband and I enjoyed this taco dip for dinner ~ I used mini sweet pepper halves to scoop the dip and he used tortilla chips. He preferred the dip warm and I liked it both heated and chilled.  


Thursday, April 28, 2022

Low Carb Italian Style Baked Chicken Bruschetta (Lean & Green)

A fresh & delicious Low Carb Meal

Ingredients: 

1 pound boneless, skinless chicken breasts

2 teaspoons olive oil

1/2 teaspoon pink Himalayan or sea salt

1/4 teaspoon ground black pepper

Olive or avocado oil cooking spray

3 cups grape tomatoes halved or quartered (depending on size)

3 cloves garlic, minced

1 teaspoon dried oregano leaves

4 teaspoons balsamic vinegar*

1 cup (4 ounces) reduced fat mozzarella cheese, grated**

1/2 cup fresh basil leaves, chopped or snipped with kitchen shears

Method:

Preheat oven to 375*. Very lightly spray an 8 inch square baking dish with a few squirts of cooking oil spray. Set aside.

Remove any fat from the chicken and cut into bite sized pieces. Heat the olive oil in a skillet over medium heat. Add the chicken and season with the 1/4 teaspoon of the salt and 1/4 teaspoon pepper. Cook, stirring occasionally, until none of the pieces look raw and are almost cooked through. Spread the cooked chicken evenly in the bottom of the prepared pan.

Cover the chicken with the tomatoes. Sprinkle with the garlic and oregano. Drizzle the vinegar over the top. Sprinkle the cheese over all.

Bake for 15 to 20 minutes, or until the casserole is heated through and the cheese is melted. 

Remove from the oven, cover loosely with a plate or foil and allow to rest for 5 minutes. Cut into 4 equal portions and garnish each portion with 1/4 of the fresh basil. Makes 4 servings.

*The higher the quality of the Balsamic vinegar, the better the flavor.

**If you are not following a low fat diet, regular mozzarella cheese may be used.

Nutritional info per serving, approximately: 256.5 calories ~ 9.8 grams fat ~ 8.9 grams carbs ~ 6.5 grams net carbs ~ 32.7 grams protein

Each serving equals: 3/4 lean portion, 1 1/2 greens, 3 condiments & 3/4 healthy fat 

Notes: To make a complete Lean & Green meal (1 lean, 3 greens. 3 condiments & 3/4 fat), I added 3/4 cup of celery sticks and a 1 ounce Lite Laughing Cow cheese wedge.  Nutritional info for the complete meal, approximately: 269.77 calories ~ 10 grams fat ~ 10.7 grams carbs ~ 7.67 grams net carbs ~ 33.65 grams protein

My entire family really enjoyed this meal ~ it is flavorful, moist & delicious


Wednesday, April 27, 2022

Strawberry Cheesecake Brownie Squares 🍓

Delicious cheesecake topped
fudge brownie squares

Cheesecake Layer Ingredients: 

8 ounces cream cheese (at room temperature)

1/4 cup sugar

1 egg (at room temperature)

1 teaspoon pure vanilla extract

1/2 cup strawberry jam

Brownie Layer Ingredients:

parchment paper

butter for greasing

2 eggs (at room temperature)

1 egg yolk (at room temperature)

1 teaspoon pure vanilla extract

1/2 cup (1 stick) unsalted butter

1/2 cup flour

1/2 cup unsweetened cocoa powder

4 ounces dark chocolate, broken or chopped

1/2 teaspoon pink Himalayan or sea salt

1/2 cup packed dark brown sugar

3/4 cup sugar

1/4 cup avocado oil

Method:

Preheat oven to 350*. Line an 8x8 baking pan with parchment paper. Lightly grease the paper with butter. Set the prepared pan aside.

Add the cream cheese, sugar, egg, vanilla and 1/4 of the jam to a medium bowl. Beat with an electric mixer, on low speed, just until the ingredients are smooth and combined. Set aside.

In a separate bowl, sift together the flour cocoa and salt and set aside. In another bowl, whisk together the eggs, yolk, sugars oil and vanilla. Set aside.

Add the butter and chocolate to a microwave safe bowl. Heat in a microwave oven for 30 seconds and then stir. Repeat until the butter and chocolate are melted and blended together. Whisk the sugar and egg mixture into the melted chocolate and butter. Use a large fork to mix in the flour mixture, just until all of the flour is blended in. 

Pour the brownie batter into the prepared baking dish and spread evenly. Pour the cheesecake batter on top of the brownie layer and carefully spread to cover. Spoon teaspoons of the remaining 1/4 cup of jam on top of the cheesecake batter.

Use a butter knife to gently swirl the jam on the cheesecake layer, being careful not to disturb the chocolate layer. 

Bake for 35 to 45 minutes or until the edges are lightly browned and set. (Halfway through baking, loosely cover with foil to keep the top from burning.)

Cool completely on a rack and then chill in the refrigerator for one hour or overnight. Cut into 16 equal squares. Store in an airtight container in the refrigerator.

Notes: These tasty brownies have a fudgy chocolate layer that is topped by a cheesecake layer that is not overly sweet.


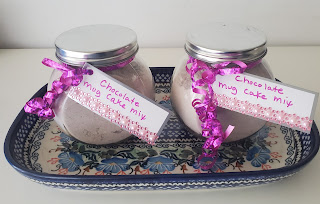
Instant Chocolate Mug Cake Mix ~ Just 3 Ingredients❣️

Pretty jars of chocolate sponge cake mix
 ready to give as gifts ~

Ingredients: 

1 box angel food cake mix**

1 box chocolate cake mix

1 (12 ounce) bag mini chocolate chips

Cake Mix Instructions:

Pour the two boxes of cake mix into a large bowl and whisk or stir together until combined. Add the chocolate chips and stir. Store in an airtight container or divide into gift jars. Makes about 3 3/4 cups of mix, which is enough to make 36 mug cakes.

Cake Preparation:

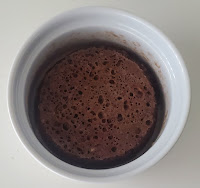
Add 3 tablespoons of cake mix to a coffee mug or ramekin. Add 2 tablespoons of water. Stir until well blended. Heat in a microwave oven for 1 minute. Makes 1 serving of instant chocolate sponge cake. 

The cake can be gently loosened and removed to a plate with a small silicone spatula, but it is fine to eat right from the mug or ramekin! If desired, garnish with ice cream, chocolate syrup, chocolate chips, fruit or whipped cream.

One serving topped with whipped
cream, chocolate syrup & 
chocolate chips.


**One of the cake mixes must be
Angel Food. I used a chocolate fudge
mix, but you can add any flavor mix
that you prefer. Lemon would be a
good choice (omit the chocolate chips).

Notes: This is a very inexpensive and quick mix to prepare and keep on hand for personal use. Kids love it and can help make the mix for gift giving. People who have busy schedules or don't bake will appreciate receiving containers of this mix with instructions. Teachers, students who reside in dorm rooms, and others who have access to a microwave oven at work all appreciate a snack that can be mixed and cooked in just 2 minutes❣️

Monday, April 25, 2022

Polish (European Style) Cheesecake


Sernik (pronounced: "seer-neek")
is a light and tasty Polish style
 cheesecake with  delicate flavors
of orange and chocolate.

Crust Ingredients:

2 cups all purpose flour

2 tablespoons unsweetened cocoa

1/2 cup sugar

1/2 teaspoon baking powder

1/8 teaspoon salt

10 tablespoons (1 1/4 sticks) unsalted butter

1 egg yolk (save the white for the cheesecake)

2 tablespoons sour cream or Greek yogurt

1 teaspoon pure vanilla extract

10 inch springform pan

butter for greasing

parchment paper

Cheesecake Ingredients:

2 1/4 cups cottage cheese (2.2 pounds)

6 large eggs + reserved egg white

1 1/4 cups sugar

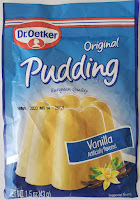
1 envelope (1.5 ounce) Dr. Oetker's vanilla pudding powder (5 tablespoons)**

1 tablespoon finely grated orange peel

2 teaspoons pure vanilla extract

1 cup butter (2 sticks) unsalted butter

whipped cream (optional garnish)

Method:

In a large bowl, sift together the flour, cocoa, sugar and salt. Cut the cold butter into small cubes. Add the butter cubes, egg yolk, sour cream ad vanilla to the sifted ingredients. Use two knives or a pastry blended to mix the ingredients together. Next, use you fingers to continue mixing. (The dough will resemble small crumbs.) Knead the dough, in the bowl, to completely blend in the butter and to form a smooth dough. 

Divide the dough into 2 portions, with one portion a tiny bit bigger than the other. (I weighed 10 ounces  of dough for my slightly larger portion.) Pat each portion into a disc about 1/2 inch thick. Wrap each disc in plastic wrap and refrigerate for at least 45 minutes.

Preheat oven to 350*. Grease the bottom and sides of the springform pan with butter. Line the bottom of the pan with parchment paper.

Transfer the smaller disc of dough to the freezer. Tear or cut the larger disc of dough into strips. Flatten and press the strips of dough onto the bottom of the prepared pan, evenly covering the surface. Prick the dough generously with a fork. Place the cake pan on a baking sheet and bake for 15 minutes. While the crust is baking, prepare the cheese batter.

Add the cottage cheese to a food processor or blender to make smooth.  Separate the egg whites and yolks, being careful not to get any yolk into the whites.

Place the 1 cup of softened butter into a large bowl. Add the 6 egg yolks 3/4 cup of the sugar and the orange peel and beat with an electric mixer until well blended. Beat in the cheese and vanilla.

In a very large bowl, beat the 7 egg whites until soft peaks form. Slowly add the remaining 1/2 cup of sugar and continue beating until the whites are stiff. Beat in the vanilla pudding powder.

Fold about 1/4 of the egg whites into the cheese mixture. Next, gently fold all of the cheese mixture into the remaining egg whites, just until combined and no stripes of whites are visible. Pour the batter on top of the warm baked crust. 

Retrieve the disc of dough from the freezer. Use the large holes of a grater to coarsely grate the frozen dough. Sprinkle on top of the cheese batter. 

Return the cheesecake, on the baking sheet, to the oven for 70 minutes. The cheesecake will rise and crack a bit in the middle and then fall. (The center will set, but still appear slightly jiggly.)

Cool on a rack for at least 3 hours and then transfer to the refrigerator for a couple of hours or overnight. (The texture and flavor improve as the cheesecake chills overnight. Carefully slide a butter knife between the cake and the sides of the pan. Once the cake is loosened, remove the springform sides. Cut into 12 to 16 slices. 

If desired, garnish with a dollop of whipped cream.

**I purchased this European style
pudding mix at World Market.
It can also be purchased online
or at specialty markets & grocery
stores that carry German foods.


Notes: This European style cheesecake has a light texture and is not overly sweet. I made it for my dear Polish mother-in-law and a Polish neighbor, who is recovering from knee surgery. They both loved it❣  My neighbor said my version was better than any her Polish girlfriends make and the best she had tasted in years. 😍


Thursday, April 21, 2022

Peanut Butter & Banana Oatmeal Breakfast Cookies (Gluten Free With Sugar Free Option)

These tasty & very low sugar cookies taste a
bit like fudge and they are nutritious enough
to serve and enjoy for breakfast

Ingredients: 

1 cup mashed/pureed bananas*

1/2 cup creamy style peanut butter**

1 tablespoon pure maple syrup**

2 cups old fashioned oats

1/2 cup mini semi-sweet chocolate chips**

Method:

Preheat oven to 350*. Line a large cookie sheet with parchment paper and set aside. Add the banana, peanut butter and syrup to a bowl. Use an electric mixer to thoroughly blend together. Stir in the oats and chocolate. 

Scoop 11 to 12  portions (approximately  1/4 cup) of dough onto the prepared cookie sheet. Flatten the cookies to 1/2 thick and about 2 to 2 1/2 inches diameter. (The cookies will not spread while baking.) 

Bake for 10 minutes or until the cookies are set and beginning to turn a light golden brown. Remove from the oven and allow to cool on the cookie sheet for at least 5 minutes. Transfer to a rack to finish cooling completely. Store in an airtight container, in the refrigerator, with pieces of waxed paper between layers of cookies. Makes 11 to 12 tasty & healthy cookies

*If ripe bananas are saved in the freezer, when brought to room temperature they will be soft and easily pureed.

**For sugar free cookies, use a natural peanut butter, Lakanto or other sugar free maple syrup and sugar free chocolate chips.

Note: Just like banana bread, these cookies taste better the next day, after they have been chilled. 😀

Creamy Homemade Vanilla Pudding

Homemade Vanilla Pudding is so
simple to make and more delicious
than pudding made from a
packaged mix.

Ingredients: 

3/4 cup sugar

1/4 cup cornstarch

3 cups milk

4 egg yolks (or 2 whole eggs)**

1 tablespoon butter

1 1/2 teaspoons pure vanilla extract

whipped cream for garnish (optional)

Method:

Whisk together the sugar and cornstarch in a large heavy saucepan or Dutch oven. Slowly whisk in the milk. Cook over medium heat, stirring constantly, until the mixture is thickened and bubbly. Cook and stir for and additional 2 minutes. Remove from the heat.

Beat the egg yolks or eggs. Gradually stir 1 cup of the hot liquid into the beaten eggs. Add the egg mixture to the remainder of the heated milk in the saucepan. If using egg yolks, bring to a gentle boil, while stirring, over medium heat. (If using whole eggs, heat just before bubbly, but do not boil.)  Reduce heat to low and continue to cook and stir for 2 or 3 more minutes. Remove from the heat. Stir in the butter and vanilla until blended in. 

Pour into 1 medium bowl or 5 to 6 dessert cups. If desired, cover and gently press plastic wrap over the top of the pudding to prevent a "skin" from forming. Chill until set for 1 hour or longer. Makes 5 to 6 servings. If desired, garnish with whipped cream.


Variation: If desired, stir 1 1/4 cups of fresh mini marshmallows into the pudding before chilling.

**Here are some recipes that use egg whites:

Gluten Free & Flourless Chocolate Walnut Cookies ~ With Keto & Sugar Free Option ~ https://carriekitchencreations.blogspot.com/2022/04/gluten-free-flourless-chocolate-walnut.html


Individual Blackberry Pavlovas (Perfect for Easter, Mother's Day and Tea Time)https://carriekitchencreations.blogspot.com/2018/03/individual-blackberry-pavlovas-perfect.html

Mini Mocha Meringues (Gluten Free ~   https://carriekitchencreations.blogspot.com/2016/01/mini-mocha-meringes.html


Lemon Pecan Coconut Meringue Cookies (Gluten Free) ~ https://carriekitchencreations.blogspot.com/2016/07/lemon-pecan-coconut-macaroons-gluten.html


Coconut Meringue Cookies (Gluten Free) ~ https://carriekitchencreations.blogspot.com/2016/06/coconut-macaroons.html


Notes: Whenever I have leftover egg yolks, I make pudding and everyone likes it

Tuesday, April 19, 2022

Creamy Meyer Lemon Chiffon Cups (With Sugar Free Option) 🍋

Pretty, creamy, lemony & delicious!

Ingredients: 

1 1/2 cups water

1/2 cup Meyer lemon juice

1/8 teaspoon sea salt

1 cup sugar (or Monkfruit/Erythritol sweetener)**

1/2 cup (1 stick) butter

5 tablespoons cornstarch

1/2 cup water

3 eggs

1 tablespoon lemon zest

1/2 cup sugar  (or Monkfruit/Erythritol sweetener)**

Optional Garnishes:

whipped cream 

yellow sprinkling sugar

Method:

Add the 1 1/2 cups water, lemon juice, salt, 1 cup sugar and butter to a large saucepan. Bring to a boil over medium heat. 

In a small bowl, whisk together the cornstarch and 1/2 cup water. Stir into the ingredients in the saucepan and reduce the heat to low. Cook and stir until the mixture is thickened.

Separate the egg whites and egg yolks into two separate bowls. Beat the yolks with a fork. Add a large spoonful of the heated mixture to the egg yolks and stir to blend. Repeat with 3 additional spoonfuls, stirring well after each addition. Return the egg mixture to the saucepan. Remove from the heat and stir in the lemon zest. Set aside to cool for 10 to 15 minutes.

Beat the egg whites, at high speed, with an electric mixer. Slowly add the 1/2 cup of sugar while beating the egg whites. Beat until stiff peaks are formed.. Fold the egg whites into the lemon mixture. Spoon the lemon chiffon into 10 small (approximately 1/2 cup) dessert cups. Refrigerate for 2 hours or longer. If desired, garnish with whipped cream and a sprinkling of decorative sugar.

**I use Lakanto Baking Sweetener because it has a finer texture than  regular substitute sweeteners. If you do not have the Baking Sweetener in your pantry, you can process the Classic Sweetener in a food processor, to create a finer texture.

Note: This light dessert is both tart & sweet. I created this dessert for my father-in-law who loves lemony treats and can only eat soft foods. It also is perfect for my husband (and others) who do not like meringue ~ It is a quick and easy, no bake, alternative to lemon meringue pie. 🍋

Gluten Free & Flourless Chocolate Walnut Cookies ~ With Keto & Sugar Free Option

My husband called these chewy,
fudgy cookies "Brookies" because
they taste like a brownie cookie!

Ingredients: 

2 cups chopped walnuts*

parchment paper

butter for greasing

3 cups powdered sugar (or Lakanto powdered sugar substitute)

1/2 cup + 3 tablespoons unsweetened cocoa powder

1 teaspoon premium instant coffee (I use Trader Joe's brand)

1/2 teaspoon pink Himalayan or sea salt

1 cup mini semi-sweet chocolate chips (or Lily's sugar free chocolate chips)

4 egg whites (at room temperature)

1 tablespoon pure vanilla extract

Method:

Preheat oven to 350*. Line a rimmed baking sheet with foil or parchment paper. Spread the walnuts on the prepared baking sheet. Toast in the oven for 7 to 8 minutes or just until the nuts are fragrant & golden. Set aside and lower the oven heat to 325*. Line 2 large baking sheets with parchment paper. Very lightly grease the paper with butter and set aside. 

In a large bowl, whisk or stir together the powdered sugar, cocoa, coffee powder and salt. Stir in the walnuts and chocolate chips. Add the egg whites and vanilla. Mix with an electric mixer, on low speed, just until all of the dry ingredients are moistened. (Be careful not to overmix.)

Spoon twelve  1 1/2 to 2 tablespoons mounds of batter onto each of the prepared baking sheets. Bake for 7 to 8 minutes. Rotate the baking sheets and return to the oven for an additional 7 minutes. (The tops will appear glossy and very slightly cracked.)  Remove from the oven and cool on the pans for 5 minutes. Slide the parchment paper (with the cookies) onto cooling racks. Once the cookies have cooled completely, transfer to an airtight container with pieces of waxed paper in between layers of cookies. Makes 2 dozen.

*Walnuts work well in these cookies, but pecans may be substitutes for the walnuts.

Nutritional info per cookie (with regular sugar and chocolate), approximately: 166.75 calories ~ 8.9 grams fat ~ 21 grams carbs ~ 19.6 grams net carbs ~ 2.8 grams protein

Nutritional info per cookie (with Monkfruit sweetener and sugar free chocolate chips), approximately: 116 calories ~ 10. 27 grams fat ~ 2.7 grams carbs ~ 1.6 grams net carbs ~ 3.5 grams protein

Note: These cookies are delicious❣  They are chewy with a rich chocolate flavor that is enhanced with a hint of coffee. Even though my husband does not like walnuts, he really liked these cookies. ❤️


Monday, April 18, 2022

Simple & Moist Red Velvet Brownies ❤️

These delicious brownie squares
are very moist and so simple to make!
My family loved them

Ingredients:

 3/4 cup (1 1/2 sticks) butter

1 cup mini chocolate chips

1 egg

1/2 cup water

1 box red velvet cake mix

4 ounces ream cheese (at room temperature)

1 egg

1/2 teaspoon pure vanilla extract

3 tablespoons sugar

Method:

Preheat oven to 325*. Line a 9 x 13 inch baking pan with parchment paper. Lightly grease the parchment with butter. Set aside.

Place the butter and chocolate chips in a large microwave safe bowl. Heat for 20 seconds and then stir. Repeat until both are melted and well blended. Use a large fork to mix in the egg and water. Add the cake mix and stir just until all is mixed in. Spread the batter evenly in the prepared pan. 

In a separate bowl, use an electric mixer to blend together the cream cheese, egg, vanilla and sugar until smooth. Pour the cream cheese mixture over the brownie batter. Use a butter knife to swirl the cream cheese mixture into the top of the brownie batter, being careful not to overmix.

Bake for 40 minutes, or until a toothpick inserted in the center comes out clean. Place on a rack to cool. Refrigerate to finish cooling completely. Once the pan of brownies is completely chilled, use the parchment paper to lift the brownies from the pan. Cut into 35 squares. Store in an airtight container in the refrigerator. Makes 35 servings.

Note: I made these brownies for my dear uncle who loves red velvet cake and he was very pleased

Sunday, April 17, 2022

Waldorf Salad With Grapes & Walnuts

My mother used to make this salad
on holidays. ~ The salad gets it's name
from the famous Waldorf Astoria Hotel's
restaurant, which opened on March 13,
1893. The first event held at the hotel
was on March 14th and the chef created
and first introduced this salad then.


Ingredients:

3 cups chopped unpared tart red apples (about 2 apples)**

2/3 cup diced celery

2/3 cup seedless red grapes, halved

2/3 cup broken walnuts (toasted or candied)

1/2 cup heavy whipping cream

1 1/2 teaspoons Dr. Oetker Whip It (optional)***

1/4 cup mayonnaise

3 tablespoons sugar

1 teaspoon lemon juice

Method:

Combine the apples, celery, grapes and walnuts in a medium bowl. 

Whip the cream (and the Whip It) until stiff peaks form.

In a separate bowl whisk together the mayo, sugar and lemon juice.  Fold into the whipped cream. 

Fold the cream and mayo mixture into the fruit mixture. Serves  8 to 10.

**Fuji or Envy apples work well, but whatever your favorite variety of red apple is will work.

***I add "Whip It", by Dr. Oetker, to my cream, because it helps it to hold it's shape, but this is optional.


Saturday, April 16, 2022

Chicken Salad With Apple & Pistachio (Almond Or Cashew) Sandwiches

This is a flavorful chicken salad
with a bit of crunch
❣️

Ingredients: 

1 1/2 cups (6 ounces) chopped cooked chicken

1/8 cup chopped pistachios, almonds or cashews

1/8 cup diced tart red apples

1 tablespoon dill pickle relish

1/8 cup chopped green onion

2 teaspoons Dijon mustard

1/4 cup avocado mayonnaise

1/2 teaspoon black pepper

1/4 teaspoon smoked paprika

4 slices of sour dough bread

butter

Method:

Place all of the ingredients a medium bowl and stir to mix. Lightly butter one side of each bread slice. (If preferred, the bread may be toasted.) Spread half of the chicken salad onto 2 of the buttered slices of bread. Top with the remaining slices of bread. Cut each sandwich in half. Makes 2 servings.

Nutritional info per sandwich, approximately: 744.4 calories ~ 36 grams fat ~ 69.76 grams carbs ~ 69.76 grams net carbs ~ 65.4 grams net carbs ~ 42.4 grams proteinAlternate Methods:

Instead of sandwiches, the chicken salad may be served on top of avocado halves. Cut the 3 avocados in half. If desired, remove the skin from the avocados. Scoop 1/4 cup of the chicken salad on top of each avocado half. Makes about 1  5/8 cups chicken salad ~ 3 to 6 stuffed avocado servings.

You can also scoop out the inside of half of a tomato and fill with the chicken salad. Or, it can be eaten as a dip with celery sticks.

Nutritional info per serving (1 avocado half), approximately: 294.57 calories ~ 25.5 grams fat ~ 10 grams carbs ~ 4 grams net carbs ~ 11.5 grams protein

Nutritional info for about a 1/2 cup portion of chicken salad, approximately: 267 calories ~ 22 grams fat ~ 3.22 grams carbs ~ 2 grams net carbs ~ 19 grams protein


Low Carb Chicken Salad Stuffed Avocados (Or Tomatoes)

Simple, Quick & Tasty!!

Ingredients: 

1 1/2 cups (6 ounces) chopped cooked chicken

1/8 cup chopped pistachios, almonds or cashews

1 tablespoon dill pickle relish

1/8 cup chopped green onion

2 teaspoons Dijon mustard

1/4 cup avocado mayonnaise

1/2 teaspoon black pepper

1/4 teaspoon smoked paprika

3 medium avocados 

Method:

Place all of the ingredients a medium bowl and stir to mix. Cut the avocados in half. If desired, remove the skin from the avocados. Scoop 1/4 cup of the chicken salad on top of each avocado half. Makes 1 1/2 cups chicken salad ~ 3 to 6 stuffed avocado servings.

Notes: You can also scoop out the inside of half of a tomato and fill with the chicken salad. Or, it can be eaten as a dip with celery sticks.

Nutritional info per serving (1 avocado half), approximately: 293 calories ~ 25.5 grams fat ~ 9.75 grams carbs ~ 2.74 grams net carbs ~ 11.5 grams protein

Nutritional info per 1/2 cup portion of chicken salad, approximately: 264. 27 calories ~ 22 grams fat ~ 2.5 grams carbs ~ 1.5 grams net carbs ~ 19 grams protein

Friday, April 15, 2022

White Chicken Enchiladas ~ Simple & Tasty


These enchiladas have a mild flavor
that pairs nicely with a salad and/ or rice.

Ingredients:
olive or avocado oil cooking spray
6 medium flour tortillas
2 cups cooked, shredded chicken
2 cups shredded Monterey Jack cheese**
3 tablespoons butter
3 tablespoons flour
2 cups chicken broth
1 cup sour cream
1 (4 ounce) can diced green chilies

Optional Garnishes:
salsa verde
guacamole
sour cream

Method:
Preheat oven to 350*. Use the cooking il spray to grease an 8 inch square pan. Set aside.
Mix chicken with 1 cup of the cheese. Divide the chicken mixture evenly between the tortillas. Roll up in the tortillas and place in the prepared pan seam side down.
In a sauce pan melt butter over low heat. Stir in the flour and cook about 1 minute. Add broth and stir until smooth. Allow to thicken. Remove from heat and stir in sour cream and chilies.
Pour sauce over enchiladas and top with remaining cheese. Bake 20-25 minutes. (After baking, if you like, you can place the pan of enchiladas under the broiler for a few minutes to brown the cheese.) If desired, garnish with a green salsa, guacamole and/or a dollop of sour cream. Makes 3 to 6 servings.

**For added spice Pepper Jack cheese may be used.

Note: This is a simple and tasty dish! I like the flavor of the green chiles and the creamy jack cheese.

Thursday, April 14, 2022

GIANT Bakery Style Chocolate Brownie Cookies

These giant cookies are decadent,
tasty & very impressive


Ingredients:

1 1/2 cups (3 sticks) unsalted butter, at room temperature

1 1/2 cups packed dark brown sugar

1/2 cup granulated sugar

3 eggs

2 tablespoons corn syrup

1 tablespoon pure vanilla extract

3 3/4 cups all purpose flour

1 cup unsweetened cocoa powder

1 tablespoon cornstarch

2 teaspoons baking soda

1 teaspoon pink Himalayan or sea salt

2/3 cup heavy cream

2 cups mini semi-sweet chocolate chips

2/3 cup powdered sugar

1/3 cup multi colored candy sprinkles**

Method:

In a large bowl, cream together the butter, brown and granulated sugars until the mixture is light and fluffy. Add the eggs, corn syrup and vanilla, mixing until completely combined.

Sift together the flour, cocoa, cornstarch, baking soda and salt. Mix into the creamed mixture until thoroughly combined and a soft dough forms. Cover and refrigerate for 30 minutes.

While the dough chills, preheat oven to 350*. Line baking sheets with parchment paper or silicone baking mats. Divide the dough into 15 equal portions   (approximately 1/2 cup each).

Roll each portion into a ball and place onto the prepared baking sheets with just 4 to 6 cookies per pan. Use your fingers or palm to flatten the balls slightly. (Similar to the shape of a hockey puck.) 

Bake for 12 to 15 minutes, or until the tops begin to crack and the centers no longer look wet. Allow to cool on the baking sheet for at least 10 minutes before transferring to a cooling rack. 

While the cookies are baking, add the heavy cream to a microwave safe bowl. Heat for 1 1/2 minutes. Add the chocolate chips to the hot cream, stirring until the chocolate is melted and blended in. Stir in the powdered sugar until completely mixed and set aside to cool. Spoon the fudge topping on top of each cookie and while the fudge is still wet, top with the candy sprinkles. Refrigerate cookies in a single layer until the fudge topping is set. Once set, transfer to an airtight container, with pieces of waxed paper in between layers of cookies. Makes 15 giant cookies.

**Regular candy sprinkles look pretty on these delicious cookies, but I used mini candy coated rainbow chips that I found at a Hobby Lobby store. The rainbow chips are a nice added touch that makes the cookies even more special.


 Notes: The flavor of these impressive cookies improves after being chilled and they keep well in the refrigerator. They can be made a few days in advance of serving or gift giving.