Thursday, March 31, 2022

Eggless Saffron Tea Cookies (With Pistachio Or Cashew Nuts)

These simple, yet exotic, little tea
cookies are fragrant & tasty!

Ingredients: 

2 tablespoons coconut milk (or milk of choice)

1 teaspoon saffron threads

6 tablespoons unsalted butter, at room temperature

1/2 cup powdered sugar

1/2 teaspoon pure vanilla extract

2 cup all purpose flour

1 teaspoon cardamom

1/8 teaspoon pink Himalayan or sea salt**

1/3 cup chopped pistachios or cashews

Method:

Add the milk to glass measuring cup or small microwaveable bowl. Heat for 20 seconds to warm. Add the saffron to the warm milk and soak for 10 minutes or longer. Use a pestle, spoon or immersion blender to crush the softened saffron.

Place the butter and sugar in a mixing bowl. Cream together, with an electric mixer, until well blended. Mix in the vanilla and saffron milk.

Sift together the flour, cardamom and salt. Blend into the butter mixture. Refrigerate the dough for 15 to 30 minutes.

Preheat oven to 350*. Line two cookie sheets with parchment paper and set aside. Divide the dough into 20 small 1 inch balls. Place the balls two inches apart on the prepared cookie sheets. Flatten the cookies with your fingers to form round disks about 1/4 inch thick. Sprinkle chopped nuts on top and press lightly into the dough.

Bake for 10 to 12 minutes. Cool for 5 minutes on the cookie sheet and then transfer to finish cooling completely on a wire rack. Makes 20 cookies. Store in an airtight container.

**If salted nuts are used, no salt needs to be added.

Notes: These rich and flavorful saffron India inspired cookies are a perfect and addictive tea time snack! 

About saffron:  Saffron is the dried orange-red stigmas of a variety of crocus flower. It is valuable because there are only 3 stigmas in each flower. They must be harvested by hand, just as the flower is opening. It takes almost 70,ooo flower to produce one pound of dried saffron. That is why this exotic spice is the most expensive one there is. 


Wednesday, March 30, 2022

Giant Cadbury Mini Chocolate Egg Easter Cookies

These giant cookies are simple
to make & very delicious❣

Ingredients: 

1 cup (2 sticks) unsalted butter, at room temperature

1 cup brown sugar

1/2 cup granulated sugar

1 egg

1 teaspoon pure vanilla extract

2 cups all purpose flour

1 teaspoon baking soda

1/2 teaspoon pink Himalayan or sea salt

1/2 cup old fashioned oats*

1 cup slightly crushed Cadbury mini eggs**

1 cup mini chocolate chips

Method:

Preheat oven to 350*. Line cookie sheets with parchment paper and set aside.

In a large bowl, use an electric mixer, on low speed, to cream together the butter and sugars, for 3 minutes. Mix until the butter and sugars are light, fluffy and smooth. Use a bowl scraper to push the dough from the sides to the center of the bowl. Mix in the egg and vanilla. 

Sift together the flour, soda and salt. Mix into the creamed ingredients, on low speed, just until almost fully combined. Stir in the oats, candy eggs and chocolate chips. (Avoid over mixing.)

Measure loose mounds of dough with a large scoop (1/3 cup) onto the prepared cookie sheets. Do not tightly pack dough, but leave in tall jagged peaks with 2 inches between mounds. 

Bake for 10 minutes or just until the edges are golden brown. Leave the cookies on the pans to cool for at least 20 minutes. (The cookies will continue to set as they cool on the hot pan.)  Store completely cooled cookies in an airtight container in the refrigerator. (Place sheets of parchment or waxed paper between layers of cookies.) Makes about 22 large (3 1/2 inch diameter) cookies.

*Even though these delicious cookies contain oats, they have the texture of chocolate chip cookies and the small amount of oats add a nutty flavor. 

**Measure 1 cup of mini candy coated chocolate Cadbury eggs. Place in a zipper lock plastic bag and crush with a rolling pin.

Notes: My husband looks forward to Springtime, when Cadbury eggs are available in the stores, so he was quite happy that I was making cookies that included them. Now, they are his new favorite cookie

Monday, March 28, 2022

🌷🍍 Simple & Cute Easter Bunny Fruit Platter 🍍🌷

This fresh fruit platter is fun and
tasty for children of all ages

 Ingredients:

1 large fresh pineapple

4 cups strawberries

4 cups green seedless grapes

1 cup blueberries

1 large marshmallow (optional)

5 toothpicks

Method:

Cut the spiked top and the bottom off of the pineapple. Carefully remove all of the rough outer skin. Cut a round slice off of each end of the pineapple and set aside.

Cut the remaining portion of of pineapple in half lengthwise. Slice each half into about 8 horizontal slices. Arrange the horizontal slices on a platter to form the long body of the bunny. 

Cut 3 edges off of one of the reserved round pineapple slices to make the bunny face. Break or cut 2 toothpicks in half. Use 3 of the broken pieces to attach 3 large blueberries to the pineapple face to make 2 eyes and a nose. Cut ears from the remaining round pineapple slice. Use 2 whole toothpicks to attach the ears above the face. If desired, use another toothpick to attach the marshmallow on the opposite end for a tail.

Remove the stems from the strawberries. Arrange the strawberries, grapes and blueberries on the platter around the pineapple bunny. Serves 8 to 10. Enjoy.

Note: This is simple to make ~ the fruits may be prepared the day before and then assembled the day the fruit salad is served.


Super Easy Holiday Nougat Candy 🍬

Pretty & Delicious Nougat Candy!
This simple recipe makes lots ~
about 77 pieces.

Ingredients: 

parchment paper

butter for greasing

2 cups gumdrops*

2 tablespoons butter

2 3/4 cups white chocolate chips

12 cups miniature marshmallows

plastic wrap (optional)**

Method:

Line an 8 inch square pan with parchment paper. Use a small amount of butter to lightly grease the parchment paper. Set aside.

Cut the gumdrops in half and set aside.

Add 2 inches of water to a large saucepan or Dutch oven. Bring to a boil and then reduce the heat to simmering. Place a heatproof bowl, that fits snuggly, over the top of the pot. Add the butter, chocolate chips and marshmallows to the bowl. 

Melt all of the ingredients, stirring constantly. (The bowl should not touch the water.) Heat just until the mixture is melted and well blended, being careful not to  overheat or burn. 

Remove from the heat and allow to cool for a couple of minutes. Stir in the gumdrops until well combined into the melted mixture. Pour into the prepared pan. If the mixture does not settle evenly, use a buttered silicone spatula or piece of parchment paper to pat and spread in the pan. Refrigerate for 2 hours or longer. (even overnight) Use the parchment paper to lift the chilled nougat from the pan. Use a sharp knife to cut into about 82 pieces. Store in an airtight container in the refrigerator, with sheets of waxed paper, or parchment paper, in between the layers of nougat.

*For Easter, I use pink and yellow gumdrops. In the Fall, I use yellow, orange and red gumdrops. At Christmas, I use red and green gumdrops.

**I cut squares of plastic wrap and wrapped each piece of nougat individually. This makes them easier to store and give as gifts. 🍬

Notes: These nougat candies are delicious and so simple to make! My husband doesn't like white chocolate or gum drops, so he was skeptical about trying these candies. He was very pleased and surprised at how much he likes this nougat❣ Everyone else who tried them loved them, too. 🥰


Thursday, March 24, 2022

Keto/ Low Carb Chocolate Brownie Loaf (Gluten Free With Dairy Free Option)


This dark chocolate brownie loaf
is quick, simple & tasty.

Ingredients: 

1 cup blanched almond flour

1/2 cup Lakanto Baking Sweetener*

1/3 cup unsweetened cocoa powder

1 envelope (0.25 ounce) unsweetened gelatin powder

1/3 cup co0ocnut oil, melted

3 tablespoons coconut milk

3 eggs

1/3 cup sugar free dark chocolate chips**

Method:

Preheat oven to 350* Grease a 9 x 3 inch loaf pan with coconut oil and set aside.

In a large bowl, sift together the flour, sweetener, cocoa and gelatin. In a separate bowl, use a fork to combine the oil, milk and eggs. Make a well in the center of the dry ingredients. Pour the liquid ingredients, all at once, into the well. Stir with a fork, just until all of the dry ingredients are mixed in. Stir in half of the chocolate chips. Spread the batter into the prepared loaf pan. Sprinkle the remaining chocolate chips on top. Bake for 30 minutes, or until the center of the bread rises and the edges are set/ solid. 

Allow to cool in the pan for 15 minutes. Remove from the pan and finish cooling completely on a rack. Once the loaf is completely cooled, slice into 10 portions. Store in an airtight container in the refrigerator.

*Lakanto Baking Sweetener has a finer texture than the regular Classic Sweetener. If you do not have the Baking Sweetener in your pantry, you can process the Classic Sweetener in a food processor, to create a finer texture.

**For a dairy free loaf, use dairy free chocolate chips.

Nutritional info per serving, approximately: 199.25 calories ~ 18 grams fat ~ 4.25 grams carbs ~ 2.3 grams net carbs ~ 6.25 grams protein

Note: This chocolate brownie bread is quick and easy to make. It flavor improves the next day after the loaf has been chilled. Nutritious & tasty


Italian Soft Chocolate Raisin Cookies


🎄 Soft, delicious, cake-like cookies with
red, white & green candy sprinkles
for Christmas and the Italian flag.

Cookie Ingredients: 

1 1/2 cups chocolate covered raisins

1/2 cup unsalted butter, at room temperature

1/2 cup shortening*

4 1/2 cups all purpose flour

1/2 cup unsweetened cocoa powder

4 1/2 teaspoons baking powder

1 teaspoon baking soda

1 1/2 teaspoons cinnamon

1/2 teaspoon pink Himalayan or sea salt

1 1/2 cups sugar

3 eggs

1/3 unsweetened plain Greek yogurt

7 tablespoons almond milk (or milk of choice)

1 teaspoon pure vanilla extract (or 3/4 teaspoon vanilla 1/4 teaspoon almond extract)

Icing Ingredients:

3 cups powdered sugar

4 tablespoons almond milk (or coffee)

2 teaspoons pure vanilla extract

1/4 cup candy sprinkles (optional)

Method:

Cut the chocolate covered raisins in half and set aside.

Heat the butter and shortening, over low heat, on the stove, just until melted. Remove from heat and sat aside. Or, place in a glass bowl or measuring cup and heat at 15 second intervals, in a microwave oven, just until melted and set aside.

Sift together the flour, cocoa, baking powder, baking soda, cinnamon and salt. In a large bowl, use an electric mixer to cream together the melted, butter, shortening and sugar for 2 to 3 minutes until well blended. Add the eggs, yogurt, milk and vanilla to the creamed mixture and blend in. Slowly add the dry ingredients, 3/4 cup at a time, beating on lowest speed, after each addition. Mix just until the dry ingredients are completely blended in. Stir in the raisins. Cover and refrigerate for at least 1 hour or overnight. 

Heat oven to 350*. Line cookie sheets with parchment paper and set aside.  Use a cookie scoop to make golf ball sized balls of dough. Roll so that the outer edges are smooth with none of the raisins on the outer surfaces of the balls. Place 2 inches apart on the prepared baking sheets. Bake for 10 to 12 minutes, or until the cookies look dry and cracks have formed. Cool on the baking sheets for 5 minutes and then transfer to wire racks to finish cooling completely before icing.

Baked and cooling before icing ~
They taste good just like this!

Sift the powdered sugar into a bowl and mix in the milk and vanilla to create a thick icing. Dip the tops of each cookie in the icing. Shake gently to remove any excess icing. If desired, sprinkle with the candy topping right away because the icing sets quickly. Return the cookies to racks for several hours, or overnight, so that the icing can set completely. Makes 6 dozen. Store in airtight containers for up to 2 weeks.

*I like to use butter flavored shortening.

Notes: These are delicious, soft, cake-like cookies with little bits of chocolate covered raisins! I think that they are prettiest when iced and decorated with red, white & green candy sprinkles, but colored sugar or other sprinkles may be used. They are a favorite

For Easter, I sprinkled pastel sugar
on top of the icing.

With gold sugar & gold candy sprinkles.


With chocolate, white & gold candy sprinkles.

Monday, March 21, 2022

Lean & Green Corned Beef & Cabbage Rolls

This is a simple & tasty way to prepare
leftovers from Saint Patrick's Day dinner.

Ingredients: 

avocado or olive oil cooking spray

5 ounces (1 - 1 1/2 cups) cooked cabbage leaves

5 ounces cooked corned beef, shredded

1 cup quartered radishes, cooked**

4 ounces (1 cup) low fat Swiss cheese or mini Babybel cheese, grated**

4 tablespoons Walden Farms 0 calorie Thousand Island Dressing**

black pepper (optional)

Method:

Preheat the oven to 350*. Very lightly spray a loaf pan or 9 inch square pan with the cooking oil spray. Lay out the cabbage leaves. Divide the corned beef and radishes evenly between the cabbage leaves. Sprinkle 3/4 of a cup of the cheese evenly over the meat and radishes. Roll up the the cabbage leaves and filling. Place the cabbage rolls in the prepared dish.  Spoon the dressing over the top of the rolls and sprinkle with the remaining cheese. Bake for 25 minutes. Makes 2 servings.

Each serving equals 1 lean, 2 1/2 greens & 1 1/4 condiments

Nutritional info per serving, approximately: 309,6 calories ~ 20.2 grams fat ~ 8 grams carbs ~ 5.7 grams net carbs ~ 24.26 grams protein

**If you are not following a low carb or low fat meal plan, chopped potatoes and regular cheese & dressing may be used.

Note: I was inspired to create this dish from the cabbage & corned beef that was leftover from our family's Saint Patrick's Day dinner. It was quite tasty! 

Sunday, March 20, 2022

Irish "Potato" Truffles (Saint Patrick's Day Candy) 🥔

These tasty little truffles are rolled
in cinnamon to resemble the color 
of mini russet potato bites. 
🥔

Ingredients: 

1/4 cup (1/2 stick) unsalted butter, at room temperature

4 ounces cream cheese, at room temperature

1 teaspoon pure vanilla extract

1/8 teaspoon pink Himalayan or sea salt

4 cups powdered sugar

2 1/3 cups shredded (not flaked) unsweetened coconut

1 tablespoon cinnamon

Method:

Line a baking sheet or large pan with waxed paper and set aside.

In a large mixing bowl, cream the butter and cream cheese with an electric mixer, until well blended and smooth. Beat in the vanilla and salt.

Sift in 1 cup of the powdered sugar and blend in with the mixer. Repeat with remaining powdered sugar, one cup at a time. Mix in the coconut, a little bit at a time, until all the ingredients are well combined. Cover and refrigerate for 30 minutes.

Use a one inch cookie scoop to measure tablespoons of dough and roll into balls. Place on the prepared baking sheet. Refrigerate for 30 minutes or longer. Add the cinnamon to a tiny bowl. Roll the chilled balls in the cinnamon to coat. Store the truffles in an airtight container, in the refrigerator, until they are served. Makes 48.

Note: These tasty truffles are simple and fun for kids to help make and everyone enjoys eating them!

Friday, March 18, 2022

Lean & Green Reuben Coleslaw

This delicious salad is a great way
to make use of leftover corned beef!

Ingredients:

4 1/2 cups of shredded cabbage

1/2 cup Walden Farms 0 Calorie Thousand Island Dressing

1 teaspoon black pepper

1/4 cup dill pickle relish

10 ounces lean corned beef

4 ounces low fat Swiss cheese or other cheese**


Method:
Place the cabbage in a large bowl. Add the salad dressing and sprinkle with the pepper. Stir to mix until all of the cabbage is coated.
Trim any fat from the corned beef and cut into 1/4 inch thick, bite sized pieces. Cut the cheese in the same manner. Stir the beef and cheese into the cabbage mixture. Divide evenly between 3 serving plates. Makes three 2 cup servings. (Leftovers may be stored in the refrigerator for 2 to 3 days.)
 
**For a spicier salad try using low fat pepper jack cheese. Babybel light or low fat mozzarella cheese work well, too

Each Serving Equals: 1 lean, 3 greens, 2 condiments & 1/4 snack

Nutritional info per serving, approximately: 349.3 calories ~ 21.4 grams fat ~ 14.5 grams carbs ~ 9.7 grams net carbs ~ 26.66 grams protein

Notes: 
I love this salad! (Even my husband, who doesn't care for corned beef, liked it.) 😀

Wednesday, March 16, 2022

Salmon Chaffle Salad (Lean & Green)


Quick, Easy & So Tasty!!

Ingredients: 

1/4 cup low fat cream cheese, at room temperature

6 tablespoons egg whites

5 ounces boneless, skinless canned or envelope of salmon 

1 cup diced celery (or 3/4 cup diced celery & 1/4 cup diced radishes)

1/4 cup diced leeks or green onion

1/4 teaspoon dried dill weed

1/4 teaspoon black pepper

1 mini Babybel light cheese round, 1/4 cup grated**

olive or avocado oil cooking spray

mini dash waffle iron

3 cups butter leaf lettuce

3 tablespoons Walden Farms 0 calorie Ranch Dressing**

3 tablespoons chopped dill pickle, optional

Method:

In a medium bowl, whisk together the cream cheese and egg whites to thoroughly combine. Add the salmon, celery, onion, dill, pepper and Babybel to the cream cheese mixture. Stir to mix. 

Heat the waffle iron and then spray with the cooking oil. Add 1/3 cup of the salmon batter to the waffle iron. Close & cook for 4 to 6 minutes. Carefully remove from the waffle iron and transfer to a cooling rack. Makes 6 mini salmon patty waffles.

Arrange 1 1/2 cups of lettuce onto two serving plates. Place 3 salmon patty waffles on top of each bed of lettuce. Drizzle 1 1/2 tablespoons of dressing over all and if desired, garnish with 1 1/2 tablespoons chopped dill pickle. Makes 2 servings.

**If you are not following a low fat meal plan, regular cheese and salad dressing may be used.

Each serving equals: 1 lean, 2 3/4 greens, 2 1/4 condiments & 1/4 optional snack

Nutritional info per serving, approximately: 209.37 calories ~ 8.47 grams fat ~ 9 grams carbs ~ 6.47 grams net carbs ~ 24.8 grams protein

Notes: This meal is so delicious and it was so simple to make! 


Tuesday, March 15, 2022

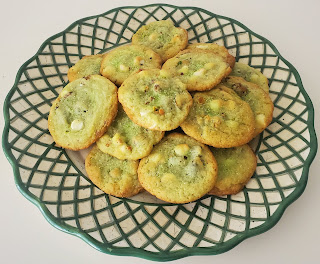
Pistachio & White Chocolate Cookies (Perfect For Christmas & Saint Patrick's Day)

Delicious Cookies with Gourmet Flavors❣

Ingredients: 

2 cups unsalted butter

2 cups sugar

4 eggs

2 (3.4 ounce) boxes pistachio pudding

2 teaspoons baking soda

1/2 teaspoon sea salt

4 cups all purpose flour

1 1/2 cups pistachios

2 cups white chocolate chips

green sprinkling sugar (optional)

Method:

Preheat oven to 350*. Line baking sheets with parchment paper. 

In a large bowl, cream together the butter and sugar with an electric mixer. Beat in the eggs. Add the pudding and mix in.

Sift together the baking soda, salt and flour. Add to the butter mixture and mix until well blended. Stir in the nuts and white chocolate chips. Refrigerate the dough for 1 hour or longer. Use a 1 inch cookie scoop to measure about 1 1/2 tablespoons of dough onto the prepared baking sheets. (Place 2 inches apart.) 

Bake for 8 to 10 minutes, or until the cookies are lightly golden brown around the edges. If desired, sprinkle with the green sugar. Cool the cookies for 10 minutes on the baking sheets and then transfer to racks to finish cooling completely. Store in an airtight container with sheets of waxed paper in between layers of cookies. Makes about 10 dozen cookies.

Notes: These cookies are both fun and tasty! The green sugar is optional, but adds a pretty sparkle. I admit that I love the flavor of pistachios❣  ~ My husband, who doesn't care for white chocolate, really liked these cookies, too. (I made lots to give as gifts ~ If you do not need 10 dozen, you may cut the amount of ingredients in half.) 😀

Monday, March 14, 2022

Chewy Grasshopper Brownies 🍀 (Chocolate Mint Leprechaun Bars)

Delicious chewy chocolate brownies
topped with a creamy vanilla mint  frosting.

Brownie Ingredients:

non-stick cooking spray, shortening or butter  

aluminum foil

4 squares unsweetened baking chocolate

¾ cup unsalted butter

2 cups sugar

3 eggs

1 teaspoon vanilla

1 cup flour

1/4 teaspoon salt

Frosting Ingredients:

1/2 cup (1 stick) unsalted butter, softened

1/2 cup (4 ounces) cream cheese, softened

3 1/2 cups powdered sugar

2 teaspoons pure vanilla extract

1 teaspoon pure peppermint extract

green food color

Garnish:

1/4 cup mini chocolate chips

2 tablespoons candy pearl sprinkles (optional)

Method:

Preheat oven to 350*. Line a 9x13 baking pan with foil. Coat foil with cooking spray, shortening or butter. Place butter and chocolate in microwave proof mixing bowl. Heat for 1 minute  and 30 seconds, or longer, until butter and chocolate are melted and can be easily mixed together. Add sugar, eggs and vanilla. Stir until mixed. Add flour, stirring until blended with the other ingredients. Pour batter into the prepared pan. Bake 30 minutes or until a toothpick inserted comes out clean. (Do not over bake.) Remove from oven and cool in pan. Lift from pan with foil and continue cooling on a rack. Finish cooling on a rack.

Use an electric mixer to cream together the butter and cream cheese. Add the powdered sugar, 1 cup at a time, beating after each edition until all is well blended. Beat in the extracts and a few drops of food coloring to flavor and tint the frosting.
Once the brownies are completely cooled, spread the frosting evenly over the the top. Sprinkle the chocolate chips over the frosting. If desired, sprinkle candied pearls on top of the frosting. Refrigerate for one hour or longer and then use the foil to lift the brownies from the pan. 


Cut into bars or squares. Makes 25 to 30 servings. Store in an airtight container in the refrigerator.

Notes: These deluxe brownies are festive and have a wonderful combination of flavors. They are pretty to serve at Christmas & on Saint Patrick's  Day.

Sunday, March 13, 2022

Savory Irish Dubliner Cheese Scones 🍀

These simple scones are light,
fluffy & delicious

 Ingredients:

1 egg

3/4 cup plus 2 tablespoons buttermilk

2 1/2 cups all purpose flour

1/4 teaspoon sea salt

1 tablespoon baking powder

2 tablespoons sugar

6 tablespoons cold unsalted butter, cut into 1 inch cubes

4 ounces Irish Dubliner cheddar cheese, cut into 1/4 inch cubes**

1/4 cup green onions, cut into 1/4 inch pieces

Method:

Preheat oven to 375*. Line a baking sheet with parchment paper and set aside.

In a small bowl, or 2 cup measuring cup, whisk together the egg and buttermilk and set aside.

Sift the flour, baking powder, salt and sugar into a large bowl. Use a pastry blender or two knives to cut the butter into the flour mixture. Continue to mix with your fingers until the butter is mixed in and the texture resembles coarse crumbs. Fold in the cheese and onions. 

Make a well in the center of the dry ingredients. Add the liquid ingredients all at once to the dry ingredients and stir just until mostly, but not completely, combined. Some flour may not be mixed in, but that is okay. (It is important not to overmix.)

Turn the dough out onto a lightly floured surface and knead briefly by hand until the dough is smooth. Pat the dough into a rectangle or square that is 3/4 to 1 inch thick. Use a sharp knife, dipped in flour, to cut the dough into 2 1/2 squares. Place the squares 1 inch apart on the prepared baking sheet. 

Reshape the scraps to form additional scones. Bake for 16 to 20 minutes, rotating the baking sheets half way through the baking time. The scones will be a light golden brown. Makes about 1 dozen. Best served while still warm or same day at room temperature. Leftovers can be reheated or toasted.

**Irish Dubliner cheese, imported from Ireland, is a natural cheese made from the milk of grass fed cows. It is a hard cheese with a slightly sweet, sharp & nutty flavor. If you don't have Irish Dubliner cheese, extra sharp cheddar may be (substituted.)

Notes: Scones basically are savory or sweet biscuits. When made properly they are light and tasty, but if they are overmixed or overbaked they can be dry & undesirable.

This recipe may be doubled and the scones freeze well.


🍑 Easy Peach Freeze (Sugar Free "Sherbet")

 Quick, Creamy, Refreshing
& not too sweet. 

Ingredients:
2 16 ounce cans peaches in fruit juice (not syrup)

Method:
Place cans of peaches in freezer until frozen. Remove and place cans under running hot water for 2 minutes. Open cans and put peaches in blender or food processor. Blend until peaches are the consistency of sherbet, pausing at intervals to work fruit down with a spatula. Makes 4 cups. Serve immediately.

Alternate Method:
Open the cans and divide the peaches (with juice) into the cavities of ice cube trays or silicone muffin pans. Freeze. Place the frozen cubes in a food processor or Blender. Mix until smooth & serve. Makes 4 cups. (I prefer this method.)

Note: This is a super simple and refreshing sugar-free dessert!

MOCHA COOKIE WAFFLE ~ An Optavia Chewy Chocolate Chip Cookie Mix Hack


🍪☕️🍪 A Tasty Mocha Cookie Waffle 🍪☕️🍪  

Ingredients:

1 envelope Chewy Chocolate Chip Cookie Mix

1 tablespoon liquid egg whites  

1 tablespoon cold coffee

coconut oil cooking spray

Method:

In a small bowl, stir together all of the ingredients. (The batter will be thick.) 

Heat a mini dash waffle maker and lightly spray with coconut oil cooking spray.

Add the prepared batter to the waffle iron. Cook several minutes until the outside is completely browned. 

Note: I always try preparing the fuelings as directed, but find that the microwave texture isn't very appealing to me. I much prefer the flavor and texture of this fueling prepared as a mini waffle❣

Saturday, March 12, 2022

Low Carb Stovetop Zuppa Toscana (My BEST Lean & Green Version)

A Simple, Flavorful & Delicious
Bowl of Soup
❣️

Ingredients:

1 1/2 pounds Italian Chicken Sausage*

3 cups radishes (cut into bite sized chunks)

1/2 cup chopped leeks or green onions

1/2 cup chopped red, orange or yellow bell pepper

4 cloves garlic, minced

4 cups chicken  or vegetable broth (or mixture of both)

1/4 teaspoon sea salt

1/4 teaspoon ground black pepper 

1/4 teaspoon crushed red pepper (optional)

2 cups baby kale**

1 1/2 cups plain Greek yogurt***

2 tablespoons grated Parmesan cheese (4 tablespoons reduced fat Parmesan)

Method:

Remove the sausage from the casing and cook in a large pot or Dutch oven, stirring to break apart as it browns. Drain the fat, but do not wipe the bottom of the pan clean. Set the sausage aside.

Add the green onion and bell pepper. Sauté for a few minutes and then add the garlic. Continue to sauté for 2 more minutes. Return the sausage to the pot. Stir in the broth, radishes and spices. Bring to a slow boil and then simmer until the radishes become tender. (about 20 minutes) 

Stir in the kale and yogurt. Simmer until heated through, being careful not to boil.

Makes 8 cups ~ Four (2 cup) servings. Garnish each serving with 1 1/2 teaspoons grated regular Parmesan cheese or 1 tablespoon reduced fat Parmesan.

*I used Trader Joe's Fully Cooked Chicken Italian Sausage. I removed the casing and then chopped the sausage into bite sized pieces.

**I purchased a baby spinach & baby kale salad mix. I used the kale for this recipe and saved the spinach for another recipe. 

***If you are following a lowfat meal plan, you may use low fat or fat free yogurt.

Nutritional info per serving (with leeks), approximately:  335 calories ~ 14 grams fat ~ 14.7 grams carbs ~ 11.36 grams net carbs ~ 39 grams protein

Each serving equals: 1 lean, 3 greens & 3 condiments

Notes: The Olive Garden's Zuppe Toscano is one of my favorites and this Lean & Green version is even better than the original! (The radishes taste like potatoes.) Precooked bowtie pasta or other noodles may be added, if you are serving this to children or others who require additional carbs.


Wednesday, March 9, 2022

Low Carb Stuffed Jalapeno Peppers (Lean & Green)

These baked stuffed jalapeno peppers
are the best "poppers" I have ever had!

Ingredients:

olive or avocado oil cooking spray

4 ounces 95 - 98 % lean ground beef, bison or turkey

6 whole raw jalapeno peppers

1/2 cup fat free Greek yogurt*

1 cup (4 ounces) grated reduced fat cheddar or Colby Jack cheese*

1/4 cup finely chopped leeks or green onions

3/4 cup finely diced red bell pepper

1/4 teaspoon garlic powder

1/4 teaspoon ground cumin

1/4 teaspoon chili powder

1/8 teaspoon smoked paprika

1/8 teaspoon salt

Method:

Preheat oven to 350*. Line a baking sheet with foil and lightly spray with cooking oil. Set aside.

Brown the ground meat in a non-stick skillet over medium-high heat. Cook and stir until all the meat is browned. Set aside.

Cut the jalapeno peppers in half lengthwise. Carefully remove the seeds and membrane.

In a medium bowl, mix together the cooked meat, yogurt, cheese, leeks, bell pepper and the spices. Divide the meat & cheese mixture evenly, using a spoon, to fill the inside of the pepper halves.

Place the filled peppers on the prepared baking sheet. Bake for 20-25 minutes or just until heated through and golden on top. 

For each serving, add 1 cup of lettuce to a plate and drizzle 1 tablespoon of dressing over the top. Add 4 pepper halves to the plate. Makes 2 to 3 servings.

*If you are not following a lower fat meal plan, you may use full fat yogurt and cheese.

Each serving of 6 pepper halves equals: 0.9 lean, 3 green & 1 1/8 condiments

Each serving of 4 pepper halves equals: 2/3 lean, 2 green & 3/4 condiment ~ To make a complete Lean & Green meal add 1 cup salad lettuce topped with 1 1/3 ounces low fat cheese, 2 ounces cooked chicken breast or 1/2 cup low fat cottage cheese. Drizzle 1 to 2 tablespoons dressing over the salad. 4 pepper halves with a small salad equals 1 lean, 3 green & 1 3/4 condiments.

Nutritional info for 4 pepper halves, approximately: 198.4 calories ~ 5.56 grams fat ~ 11.6 grams carbs ~ 9 grams net carbs ~ 25 grams protein

Nutritional info for 6 pepper halves, approximately: 297.6 calories ~ 8.35 grams fat ~ 17.5 grams carbs ~ 13.65 grams net carbs ~ 37.6 grams protein

Nutritional info for 1 pepper half, approximately: 49.6 calories ~ 1.39 grams fat ~ 2.9 grams carbs ~ 2.27 grams net carbs ~ 6.26 grams protein

Note: I ate 6 of these for my dinner and served 2 to the rest of the family as a side to their meals. Everyone loved them!


Mocha Cheesecake Protein Shake ~ (Optavia Creamy Chocolate Shake Fueling Hack)

Creamy, Delicious & Satisfying ~
A real treat
❣❣


Ingredients:

1/2 cup cold black coffee

1 tablespoon low fat cream cheese**

1 envelope Optavia Creamy Chocolate Shake mix

4 ice cubes (about 1/2 cup ice)

Method:

Add the coffee, cream cheese and shake mix to a blender cannister. Mix to blend. Add the ice and continue to blend until all of the ice is mixed in and the shake is smooth. Enjoy! Makes one serving.

One serving equals: 1 fueling & 1 condiment

**If desired, the amount of cream cheese may be doubled. If 2 tablespoons are used, the shake contains 2 condiments.

Note: This shake is very tasty ~ my husband and I both like it prepared this way. 


Tuesday, March 8, 2022

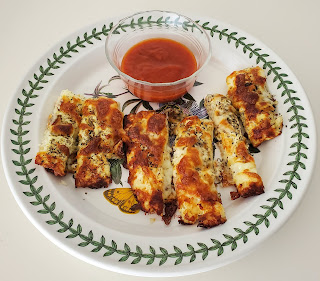
Low Carb Cauliflower Breadsticks (Lean & Green ~ Gluten & Nut Free)

These veggie breadsticks are
very flavorful & delicious!

Ingredients:

parchment paper

avocado or olive oil cooking spray

2 cups riced cauliflower*

1/2 cup liquid egg whites

8 ounces reduced fat mozzarella cheese (2 cups grated)**

1/8 teaspoon garlic powder

1/8 teaspoon sea salt

1/2 teaspoon dry basil leaves

1/2 teaspoon dry oregano leaves

1/2 cup low carb marinara sauce**

Method:

Preheat oven to 350* (325* if using a glass pan). Line a 9 x 9 inch square pan with parchment paper. Lightly spray the parchment with cooking oil spray and set aside.

Add the cauliflower, egg whites and 1 1/2 cups of cheese to a large bowl. Mix well and pour into the prepared pan. Bake for 30 minutes.

Remove from the oven. Increase oven heat to 450*. Top with an additional piece of parchment paper and a pizza stone or baking sheet. Carefully invert. Remove the square pan and parchment liner. 

Return to the oven and bake for another 15 to 17 minutes. Add the spices to a very small bowl, and blend with a pestle or the back of a spoon. Set aside.

Remove from the oven. Use a sharp knife or pizza cutter to cut the dough into 12 equal portions. Carefully separate slightly. Sprinkle the spice mixture over the breadsticks. Top with the remaining 1/2 cup of cheese. Return to the oven for an additional 10 minutes, or until the cheese is melted. While the breadsticks finish baking, heat the marinara sauce in a small saucepan or in a microwave safe bowl (or glass measuring cup).

Cut between the bread sticks, and melted cheese, to separate again. Place 6 breadsticks on a serving plate with 1/4 cup marinara for dipping or drizzling. Makes 2 servings.

*I keep bags of riced cauliflower in my freezer, so that I always have it on hand when I need a quick vegetable to add to a meal. If you have the time, you may also grate fresh cauliflower.

**If you are not following a low fat meal plan, regular mozzarella may be used.

***I use Victoria brand low carb sauce, but any sauce that has 50 calories (or less) & 3 grams fat, per 1/4 cup will work.

Each servings equals: 1 lean, 3 green & 2 1/4 condiments

Nutritional info per serving, approximately: 428 calories ~ 25 grams fat ~ 15.25 grams carbs ~ 12.6 grams net carbs ~ 36.28 grams protein

Note: My husband was skeptical when I told him I was making "cauliflower breadsticks", but he really enjoyed this meal and was so glad that he tried them! 😀